Creating or Importing 360-Degree Photos
Photosphere is a 360-degree panorama feature that lets you take pictures of the world around you with your phone, then share them online. With Placez, the Photosphere option allows you to present your layout within a full panoramic image of the space. By just clicking a link, your customer can literally scan the entire 360-degree view of your setup - as if he or she were actually there!
If any one dimension of your space is 100 feet (30.5 meters) or more, it is recommended you hire a professional photographer with professional 360-degree camera and tripod. For smaller spaces, a simple app can be used to take a series of multiple images in multiple circles around your space - which the app then blends into one 360-degree panoramic.
Prepare Your Space
To ready your space for a 360-degree photosphere shoot, remove any tables, chairs and other non-permanent objects. Be sure your space is fully lit with bright lights; for outside venues, take the images at midday with shadows directly below fixed objects.
- Place your phone in the vertical position and no more than one foot from your face at a stable height of approximately six (6) feet.
Note: It is important that all photos from all angles (straight ahead as well as up and down) be taken from the same height. - Tap the camera icon on your phone and choose the Photo Sphere option
 .
.
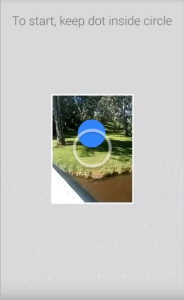
Result: The screen shows a blue circle in the middle of your camera shot.
- Move your camera slightly so that the bluecircle is placed perfectly in the open white circle in the center of your view finder.
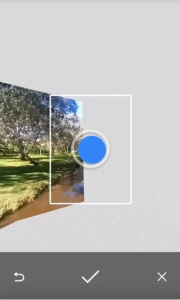
Result: The camera automatically snaps the photo. - Move the camera slowly to the next dot to your right or left and repeat Step 5 to take the next picture.

- Repeat Steps 5 & 6 to take a full circle of pictures facing straight ahead.
- Being careful to maintain roughly the same camera height, angle your phone upwards toward the ceiling (or sky for outdoor venues) and repeat Steps 5-6 to take a full circle from that angle.
- Tilt the camera upwards more to take another circle of photos, and repeat if more orange circles are visible in the view finder as you tilt up.
- Again maintaining camera height, angle your phone downwards toward the floor (or ground) and repeat Steps 5-6 again.
- Tilt the camera downwards more and take another circle of photos, and repeat if more orange circles are visible in the view finder as you tilt down.
- When finished, tap the check mark icon at the bottom of the screen.
- Open the picture gallery on your phone.
- Tap the photosphere image you want to share.
- Tap the Share icon at the top of the screen
 and choose Email.
 - Send the image via email or other format to yourself or your team to be imported into Placez.
- Prepare your space as described at the top of this page.
- Download and install the free Google Street View app from the App Store.
- Open the Street View app.
- Place your phone in the vertical position and no more than one foot from your face at a stable height of approximately six (6) feet.
Note: It is important that all photos from all angles (straight ahead as well as up and down) be taken from the same height. - When you are ready to begin shooting the images, tap the camera icon, located in the bottom right of the app
 and choose Take Photo Sphere.
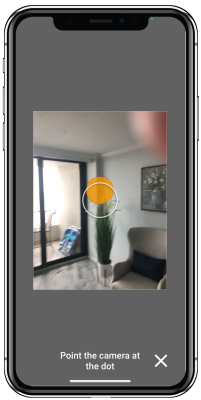
Result: The screen shows an orange circle in the middle of your camera shot.
- Move your camera slightly so that the orange circle is placed perfectly in the open white circle in the center of your view finder.
Result: The camera automatically snaps the photo. - Move the camera slowly to the next dot to your right or left and repeat Step 5 to take the next picture.

- Repeat Steps 5 & 6 to take a full circle of pictures facing straight ahead.
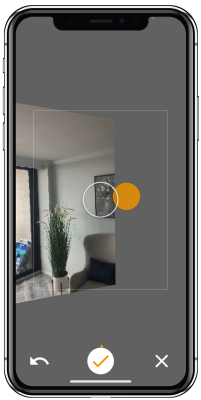
Note: As you take images, your progress is indicated by the orange circle surrounding the "Done" check mark at the bottom of the screen .
. - Being careful to maintain roughly the same camera height, angle your phone upwards toward the ceiling (or sky for outdoor venues) and repeat Steps 5-6 to take a full circle from that angle.
- Tilt the camera upwards more to take another circle of photos, and repeat if more orange circles are visible in the view finder as you tilt up.
Note: Continue to measure your progress using the orange circle surrounding the "Done" check mark (see note above).
 - Again maintaining camera height, angle your phone downwards toward the floor (or ground) and repeat Steps 5-6 again.
- Tilt the camera downwards more and take another circle of photos, and repeat if more orange circles are visible in the view finder as you tilt down.
- When finished, tap the Done icon
 at the bottom of the screen.
Note: If this icon is not green as shown above, see Steps 5-11 above as you must not have taken all necessary photos.
- Open the Street View app on your iPhone or iPad.
- Tap the Private tab at the top of the display.
- At the bottom of the display, scroll to the collection of images containing the one you want to access.
- Tap the collection of images, and scroll through to find the specific photosphere image you want.
- Tap your preferred image.
Result: A large copy of your image is visible onscreen, and after about five seconds the "Publish to Google Maps" option appears at the bottom.
Note: If the "Publish" option does not appear, try tapping the full image a second time. - Tap the small, black Share circle button
 , located at the bottom right of the display.
Result: A message appears. - On the message that pops up, tap Share Privately.
Result: A list of sharing options appears at the bottom of your screen. - Send the image via email or other format to yourself or your team to be imported into Placez.
When you shoot a 360-degree spherical image, you capture every point around you in all directions. See the tips below for best results.
- Ensure your phone has enough memory to store your photos and that your phone is fully charged.
- Stabilize the camera at approximately six feet.
- Space the photos about three feet apart (two small steps) when indoors and 10 feet apart (five steps) when outdoors.
- Ensure pictures are taken at least three feet away from the wall.
- Ensure there are no obstructions in your line of sight, and remove all tables and chairs and any non-permanent objects from the venue.
- Outside shots should be taken around noon, with shadows directly below all fixed objects.
See Also